¶ Overview
Prusa i3 MK3S Bear is a 3D printer modified from the original Prusa i3 MK3S. Prusa i3 is a series of 3D printers designed by Josef Prusa, a Czech engineer and founder of Prusa Research. Since its popularity, replacement parts are available from various manufacturers.
¶ Specifications
- Type: FDM
- Build Volume: 250 x 210 x 410 mm
- Layer Resolution: 50 microns
- Filament Diameter: 1.75 mm
- Nozzle Diameter: 0.4 mm
- Print Bed: Heated bed
¶ Operation
¶ Preparing the Printer
- Turn on the printer.
- Check the nozzle, bed, and filament spool for any obstructions or damage.
- Preheat the nozzle and bed to the desired temperature.
¶ Printing
- Save the gcode file to an SD card, and insert it into the printer.
- Select the
print from mediaoption on the printer's display. - Choose the desired file from the SD card.
- Wait for the leveling process to complete. It will probe the bed at 3x3 grid points. If the process stops before finihsing all 9 points, it indicates the bed is not level. Stop the process and refer to the troubleshooting section.
- The printer will start from printing a line on the left side of the bed to the right side.
- Monitor the first layer to ensure proper adhesion to the bed. If the first layer is not sticking to the bed, stop the print and refer to the troubleshooting section.
- Usually, if the first several layers are printed correctly, the rest of the print will be successful. However, it is recommended to monitor the print periodically.
¶ Post-Printing
- Make sure the printer has cooled down before touching the printed object and bed.
- Remove the printed object from the bed. Prusa i3 MK3S Bear has a removable magnetic bed, remove the bed and flex it to remove the object.
¶ Slicer Parameters
¶ Cura
¶ Printer Settings
- X(Width):
250.0mm - Y(Depth):
210.0mm - Z(Height):
410.0mm - Build plate shape:
Rectangular - Origin at center:
false - Heated bed:
true - Heated build volume:
false - G-code flavor:
Marlin
¶ Printhead Setting
- X min:
-31mm - Y min:
-40mm - X max:
34mm - Y max:
31mm - Gantry Height:
28mm - Number of extruder:
1 - Apply offsets to GCode:
true
¶ Start GCode
G21 ; set units to millimeters
G90 ; use absolute positioning
M82 ; absolute extrusion mode
M900 K0.0 ; place your linear advance value here
G28 ; home all
G29 ; mesh bed leveling
M420 S1;
M104 S{material_print_temperature_layer_0} ; set extruder temp
M140 S{material_bed_temperature_layer_0} ; set bed temp
M190 S{material_bed_temperature_layer_0} ; wait for bed temp
M109 S{material_print_temperature_layer_0} ; wait for extruder temp
G1 X5 Z0.6 Y1.0 F1000.0 ; go outside print area
G92 E0.0
G1 X60.0 E9.0 F1000.0 ; intro line
G1 X100.0 E12.5 F1000.0 ; intro line
G92 E0.0
¶ End GCode
M104 S0 ; turn off extruder
M140 S0 ; turn off heatbed
M107 ; turn off fan
G1 X0 Y210; home X axis and push Y forward
M84 ; disable motors
¶ Troubleshooting
¶ PLA clogging problem
To optimize the printing results, particularly with PLA material and all-metal hotends, consider the following factors:
-
Check the Fan:
Ensure that the cooling fan for the hotend radiator (located above the nozzle, different from the print cooling fan) is clean, free of dust or obstructions, and operating correctly. This fan typically activates when the nozzle is open and hot. -
Increase Printing Speed:
Printing at a higher speed can prevent heat diffusion. Slow printing allows more time for heat absorption, potentially causing material softening and buildup inside the hotend. Avoid speeds below 10mm/s. Keep in mind that PLA materials soften above 50℃, even if their melting point is higher. -
Lower Resolution:
Opt for thicker layers to facilitate faster printing with improved quality flow. Choose a minimum of 0.15mm or 0.2mm. Maintain material movement to prevent excessive softening due to heat. -
Print at Lower Temperatures:
Print at the lowest possible temperature for good layer adhesion. For HTPLA, it's typically 215-220℃ but can vary for different PLA composite materials, potentially as low as 180℃. -
Adjust Flow Rate:
Reduce flow rate settings to balance the flow and prevent excessive material from entering the hotend. Too much material can lead to compression, expansion, and pressure/friction within the hotend. -
Eliminate Flow Restrictions:
Replace small nozzles with larger ones (e.g., 0.6mm or 0.8mm instead of 0.5mm or smaller) to avoid material flow restrictions. Ensure the initial layer gap is not too small, as it can cause similar flow restrictions, limited to the first layer. -
Minimize Retraction:
With balanced flow and fewer restrictions, excessive retraction is unnecessary. Over-retraction rarely solves dripping/oozing issues and may lead to plastic being pulled into unintended areas. -
Maintain Temperature:
As you extrude more plastic, ensure the actual printing temperature matches the set temperature. If unable to maintain the set temperature, reduce print speed until stability is achieved. -
Apply Lubrication:
When other methods fail, applying a thin layer of mineral or vegetable oil on the filament surface can enhance smooth movement, especially in all-metal hotends. This should be a last resort due to potential long-term effects on hotend performance and layer adhesion. -
Heat Treatment:
A last resort to address severe clogs caused by excessive heat and pressure. Be cautious of potential drawbacks such as increased brittleness in composite materials. -
Go Back to Basics:
If all else fails, revert to standard print parameters and filament settings to ensure the printer is operating as expected.
Remember, the material flowing into the hotend must equal what flows out of the nozzle. Flow is finite; you cannot input more material than it can output.
Clogging troubleshooting and heating head replacement
¶ Platform Not Level
Before the machine start printing, the nozzle are expected to point 9 (12 for some machines) positions evenly (3* 3) on the platform in order to check the level. However, if the nozzle back to the origin before it point all positions, it indicates either the nozzle is too near or too far (or both) at the same time along the X or Y-axis. Or in other words: if the left side of your nozzle is too close and the right side it is fine or even too high up, your bed is most likely at an angle – not level with the nozzle. The same goes for front and back and of course, this can happen on both axis at the same time..
The following shows the solution for fixing this problem on Prusa:
- Make sure the nozzle is on the origin.
- Switch to the "Motion" >> "Axis Z" >> (unfinished, will be confirmed)
- Look at the distance between the nozzle and platform.
- Move the nozzle manually to the righthand side, repeat step 3.
- Compare the two distances.
- Adjust the platform level by turning the rod(s).
¶ Maintenance
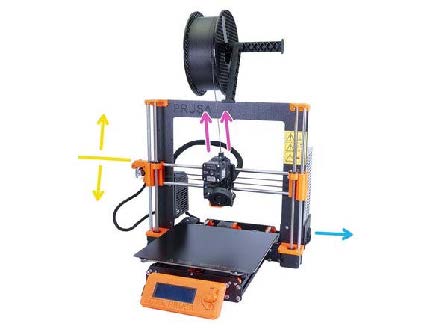
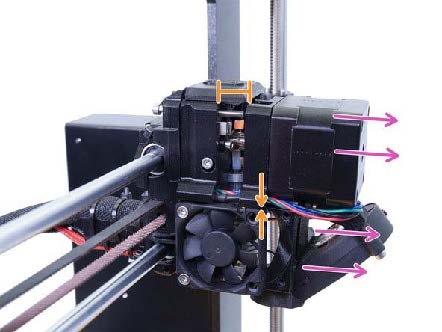
- Raise the extruder (press and hold the button to raise the Z-axis).
- Move the extruder to approximately the central position (adjust the X-axis or manually push with the power off).
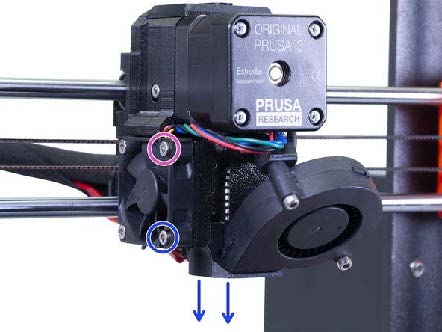
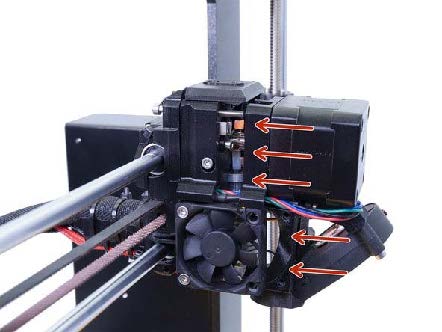
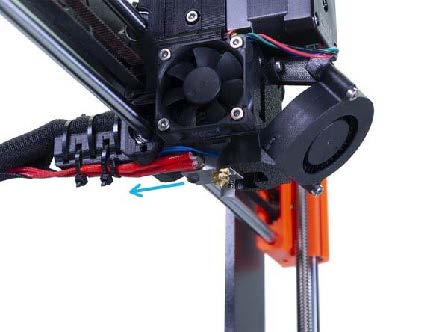
- Loosen these two screws by turning them counterclockwise. They must be fully loosened. After loosening them, you can remove the fan cover with the blue arrow pointing downward.
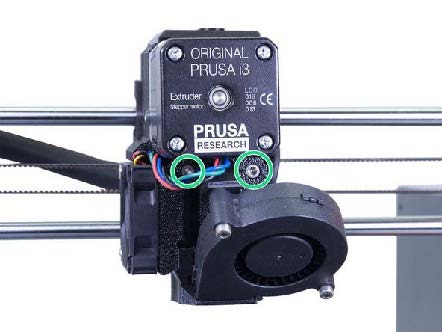
- Loosen and remove these two screws as well. These screws are quite long (M3x40), and it is recommended to completely remove them for easier completion of the following steps.
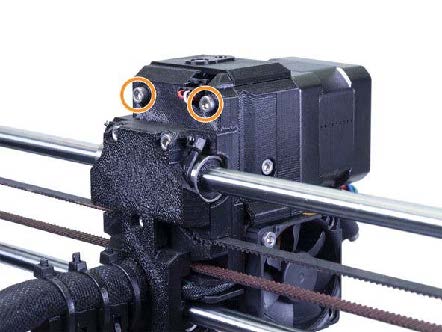
- Loosen and remove these two screws as well. These screws are also quite long (M3x40). While it's not necessary to fully remove these screws, it is recommended for greater convenience in the following steps.
- At this point, pull the motor outward, creating an approximately 1cm gap in the center.
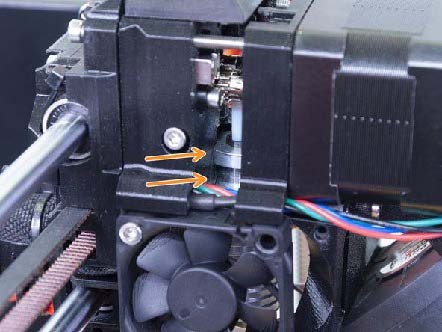
- You can observe the hotend inside the slot, and remove it from the slot (the slot is not locked, so you can simply slide it out).
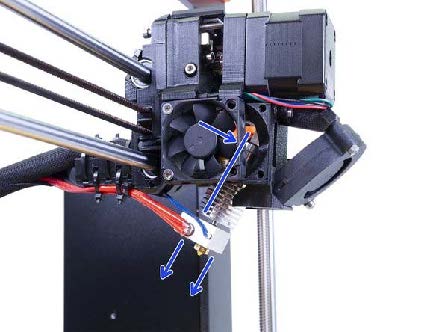
- The E3D hotend can now be detached and removed from the slot.
- You can now remove the entire E3D hotend, being careful not to damage the wires.
- Reassemble the motor on the extruder. Perform this action carefully, ensuring both parts fit snugly together without pinching any wires or other objects.
- Reinstall the extruder in reverse order.
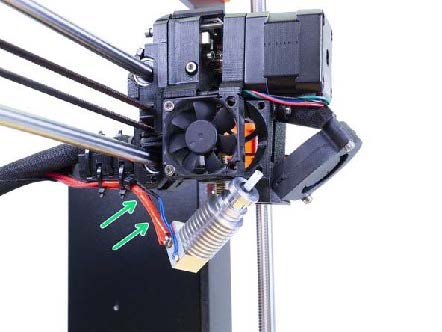
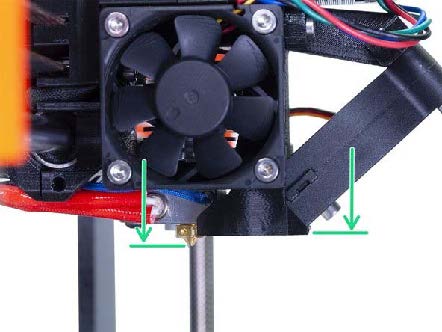
- Ensure the bottom flat nozzle is the lowest point; improperly installing the fan cover below the nozzle may render printing impossible. Please double-check and readjust if necessary.
- Ensure the wires from the hotend do not hang lower than the nozzle to prevent interference.
- Verify that the heating block is correctly oriented and not tilted, preventing it from touching plastic parts and causing damage.
- If any of the above issues occur, make necessary adjustments before proceeding with printing.
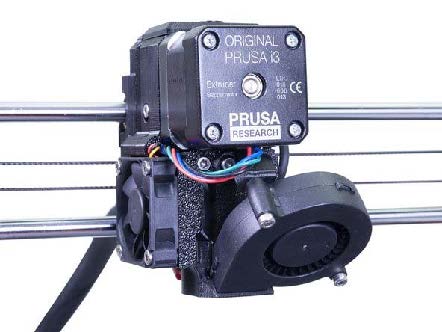
- You have completed the maintenance of the extruder.