¶ Preparation
- Turn on the computer.
- Open the top door of the laser cutter, and move the focus carriage by hand to the center of the work area.
- Place the maintenance plate or a paper sheet under the carriage, in case the screws fall into the honeycomb table.
- hold the front cover (2) with one hand and remove the three thumbscrews with the other hand. Pull the front cover straight out.
- Perform visual inpection of the #3 mirror and focus lens(4), clean them if necessary.
- To clean the mirror and lens, moisten the cotton swab with the 95% isopropyl alcohol solution. Roll a fresh cotton swab across the mirror in one direction. Use a fresh swab for each pass. Be gentle when cleaning the optic to avoid scratching the surface. Repeat this procedure for the focus lens, but make sure you clean both sides of the lens. Place the optics back once finished.
CAUTION
Make sure you give time for everything to completely dry before use. There could be a small amount of water on the lens, which could crack the lens if used.
CAUTION
Do not clean an optic that is visually clean. Excessive cleaning can damage the optical coatings. To prevent contamination, wash your hands thoroughly before handling and cleaning any optic. Try not to touch the optical surfaces with your fingers, handle optics only by the edge or optical housing. Fingerprints can damage the optical coatings.
- Turn on the venting fan of the laser cutter room.
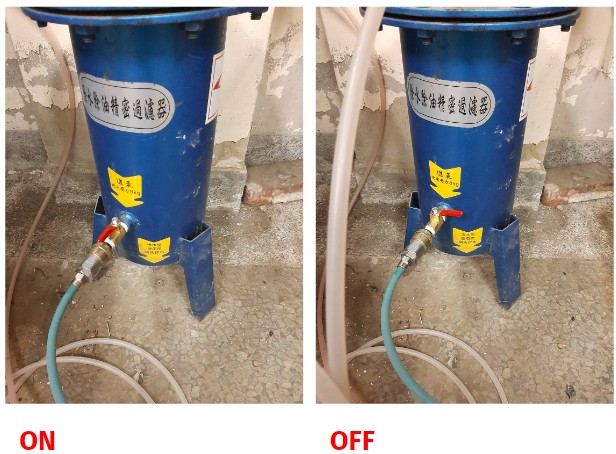
- Open the compressed air valve. You should hear the hissing sound of flowing air coming from the focus carriage. If not, contact Mr. Kuo(54106). Do not proceed before the air compressor is note turned on.
- Close the top door and turn on the laser cutter.
¶ File Setup
- Create a subfolder named the format of
yymmdd-xxin the folderLaser Cutting Archiveon the desktop. - Open the template file
公版_Template.3dmon the desktop. When prompted ‘Open Read-only file’, proceed with open read-only. - Copy and paste your drawing to the template, and save a new file to the subfolder in step 1.
The performance of cutters will gradually decrease after frequent use. A test cut is always recommended to ensure your cut will succeed in one shot.
- Find an unused place to perform a test cut. Draw small rectangles on the layer CUT.
- In most cases, use Black for engraving, Red for cutting, and Green for reference lines (boundary lines, previously cut parts, comments). Using more color is possible.
- Use **File/Print..., Ctrl+P, or the command Print to bring up the cutting dialog.
- Check the following setting:
1.Printer: VLS4.60/75
2.Orientation: Landscape
3.Output Type: Vector Output
4.Output Color: Display Color
5.View and Output Scale: Top view and Window. Click Set... to make sure the printing area matches the green boundary line in the template. - Click Properties to bring up the laser cutting dialog box.
¶ Cutting Parameters
- Select all layers, and set power: 0%, speed: 50%, PPI: 1000, Z-Axis to match the material thickness. Set the mode on the right top corner to skip and z-axis to on. Click Set to update the setting. This setting might seem redundant, yet it help eliminate unexpected cutting if you missed something during the setup.
- Select the color Black, and change the speed and power to desired amount. Click Set to update the setting.% Power and % Speed work together in determining how deep the engraving or cutting will be. Higher power and slower speeds produce deeper results. Lower power and higher speeds produce shallower results.
- Select the color Red, and change the speed and power to desired amount. Click Set to update the setting.
- Click Apply, then OK. Go back to Rhino and click Print.
- Go to the desktop, and click UCP (red square icon) to bring up the cutting panel. If that doesn’t bring up the panel, click the minimized icon in the notification area at the bottom right corner.
- Click the setting to confirm the settings, then hit the green Run to start cutting.
- Repeat the setting-cutting procedure until the parameters are well-tested, then proceed to cut.
¶ Cutting
Never operate the laser system without the constant supervision of the cutting and engraving process.
Exposure to the laser beam may cause the ignition of combustible materials which can lead to a fire. A properly maintained fire extinguisher should be kept on hand at all times.
Be alert for a fire in the laser cutter; don’t let a small fire become a large one.
Fire
Follow these steps when attempting to put out a fire in a laser cutter.
- Lift the Lid: This will turn off the cutting laser and stop adding heat to the flame.
- When a flame is out, adjust your cut settings, then continue or restart the job.
- Blow Out the Flame: If the operator feels safe, attempt to blow out the flame.
- Use a fire extinguisher if necessary.
¶ Post-Use Maintenance
Never clean any optic right after engraving or cutting because the optic may be hot and the cool lens cleaning solution may thermally shock the optic and crack it.
- Turn off the laser systems.
- Record your usage
- Remove all materials and debris in the working area, including the enclosure. Scrap material left in the laser system including materials that collect in the removable cutting table device can be a fire hazard.
- If you want to donate the remaining material, please consult the lab assistants. Otherwise, take away everything you bring.
- Close the compressed air valve.
- Turn off the venting fan, computer, and lights.
- Perform the lens inspection and clearance process as outlined in the preparation section.